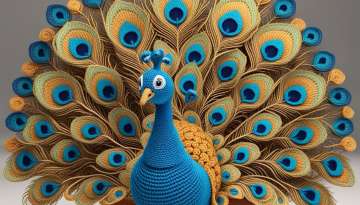
Halloween themed pumpkin planter, Halloween themed pumpkin planter,
Foody DaD is a video Center
- 1 | 4

Material List Yarns (Cotton or Acrylic Yarn suitable for amigurumi): Orange (For the pumpkin pot) Black (For the cats, facial features, and details) Purple (For the bats) Green (For the stems, leaves, and vines) Yellow (For the cat eyes) White (Small amount for bat teeth and eye highlights) Other Materials: 2.0 mm – 2.5 mm crochet hook (Appropriate for your yarn thickness) Fiberfill stuffing Floral wire or craft wire (To keep the stems upright and shape the vines) Black and yellow felt pieces (Optional: for cat eyes and pumpkin face details) 6 mm safety eyes (For the bats) Stitch marker, tapestry needle, and scissors Abbreviations MR: Magic Ring sc: Single crochet inc: Increase (2 sc in the same stitch) dec: Decrease (Sc 2 stitches together) BLO: Back loop only FLO: Front loop only dc: Double crochet hdc: Half double crochet ch: Chain sl st: Slip stitch
- 2 | 4

1. Pumpkin Pot Pattern We start from the base and work our way up to form the segmented pumpkin pot. Rnd 1: 6 sc in MR (6) Rnd 2: inc in every st (12) Rnd 3: (1 sc, 1 inc) * 6 (18) Rnd 4: (2 sc, 1 inc) * 6 (24) Rnd 5: (3 sc, 1 inc) * 6 (30) Rnd 6: (4 sc, 1 inc) * 6 (36) Rnd 7: (5 sc, 1 inc) * 6 (42) Rnd 8: (6 sc, 1 inc) * 6 (48) Rnd 9: (7 sc, 1 inc) * 6 (54) Rnd 10: (8 sc, 1 inc) * 6 (60) Rnd 11: (9 sc, 1 inc) * 6 (66) Rnd 12: BLO sc in each st around (66) — Helps the base sit flat. Rnd 13–30: Sc in each st around for 18 rounds (66) Rnd 31: (9 sc, 1 dec) * 6 (60) Rnd 32: (8 sc, 1 dec) * 6 (54) Rnd 33 (Ruffled Edging): In FLO: (1 sc, 1 hdc, 1 dc, 1 hdc, 1 sc) into each stitch to create the wavy ruffled edge. Fasten off. Inner Soil Part (In Green Yarn): Crochet a flat circular piece following Rnds 1 to 11 of the pumpkin base (until you reach 66 sc). Pumpkin Shaping (Segments): Fill the pumpkin pot firmly with fiberfill. Thread a long piece of orange yarn through a tapestry needle. Insert the needle through the center of the base, pull it up through the top center, wrap it around the outside of the pot, and pull tight to create 6 or 8 equal pumpkin segments. Sew the green soil disk to the inner BLO loops near the top opening (after inserting all filled stems). Cut eyes and mouth shapes from black felt and glue them on, or embroider the facial features using black yarn.
- 3 | 4

2. Cat Flower Head Pattern (Make 3) The cat heads sit atop the stems like flower blossoms. Rnd 1: 6 sc in MR (6) Rnd 2: inc in every st (12) Rnd 3: (1 sc, 1 inc) * 6 (18) Rnd 4: (2 sc, 1 inc) * 6 (24) Rnd 5: (3 sc, 1 inc) * 6 (30) Rnd 6–12: Sc in each st around (30) Ears (Formed on Rnd 13 directly on the head): 1st Ear: 6 sc, turn; 6 sc, turn; (1 dec, 2 sc, 1 dec = 4 sc), turn; (2 dec = 2 sc), turn; (1 dec = 1 sc). Fasten off. Skip 9 stitches, join yarn, and repeat the same steps for the 2nd Ear. Sew and close the gap between/behind the ears, filling the head firmly with fiberfill. Eyes & Face: Cut oval eyes from yellow felt, embroider black vertical slit pupils, and glue them on (or embroider the eyes using yellow and black yarn). 3. Bat Flower Head Pattern (Make 2) Head (In Purple Yarn): Rnd 1: 6 sc in MR (6) Rnd 2: inc in every st (12) Rnd 3: (1 sc, 1 inc) * 6 (18) Rnd 4: (2 sc, 1 inc) * 6 (24) Rnd 5–9: Sc in each st around (24) Attach 6 mm safety eyes (or embroider with black yarn). Rnd 10: (2 sc, 1 dec) * 6 (18) — Stuff with fiberfill. Rnd 11: (1 sc, 1 dec) * 6 (12) Rnd 12: 6 dec (6). Weave through remaining stitches and fasten off. Ears (Make 2 - In Purple Yarn): In MR: 1 sc, 1 hdc, 1 dc, 1 hdc, 1 sc. Pull ring tight and sew to the top of the head. Wings (Make 2 - In Purple Yarn): Ch 7. Starting from 2nd ch from hook: 1 sc, 1 hdc, 2 dc, 1 hdc, 3 sc in last st. Working on the opposite side of the chain, work back to shape the bat wing, then sl st to close. Sew to the sides of the head. Embroider small white fangs using white yarn.
- 4 | 4

4. Stems, Leaves & Curly Vines Stems (Make 5): Chain 25 to 40 (depending on desired height variations). Working back along the chain, sc or hdc in each st to form a sturdy stem. Insert craft wire inside to keep them upright. Sew the cat and bat heads securely to the top of each stem. Leaves (Make Multiple): Ch 9. Starting in 2nd ch from hook: 1 sl st, 1 sc, 1 hdc, 2 dc, 1 hdc, 1 sc, 3 sc in last st (to turn). Working along the other side of the chain: 1 sc, 1 hdc, 2 dc, 1 hdc, 1 sc, 1 sl st. Sew the leaves along the stems. Curly Vines (Make 2–3): Ch 30 to 40. Work 3 sc into every chain stitch. The piece will naturally curl into a spiral vine shape. Assembly Stuff the pumpkin pot and pull the shaping threads tightly to form the deep ridges. Insert the wire-supported stems through the center of the green soil base and secure them underneath. Attach the finished cat and bat heads to the tops of the stems if not already done. Sew leaves along the stem heights. Attach the spiral vines so they cascade over the outer edge of the pumpkin pot. Sew the green soil disk securely into the inner top rim of the pumpkin pot to seal the assembly.
Popular Videos


Related Galleries