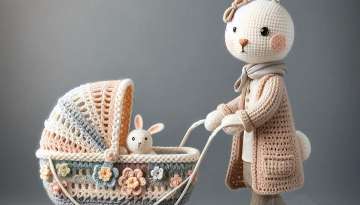
Amigurumi mouse crochet free pattern
Foody DaD is a video Center
- 1 | 3

????️ Required Materials Yarn: Cream (or off-white) and a small amount of pink amigurumi yarn for the inner ears, nose, hands, and feet (Cotton or cotton-blend yarns are ideal). Crochet Hook: 2.00 mm or 2.20 mm (or a size suitable for your yarn). Eyes: 2 pcs of 5 mm or 6 mm black safety eyes. Stuffing: Fiberfill (polyester stuffing). Other: Yarn needle for sewing, thin black/white sewing thread or fishing line for whiskers, and a bit of pink blush or pastel chalk for the cheeks. ???? Abbreviations (US Terms) MR: Magic Ring SC: Single Crochet INC: Increase (2 sc in the same stitch) DEC: Decrease (Invisible decrease preferred) W: 3 SC in the same stitch *(…)6: Repeat the instructions inside the parentheses 6 times. ???? Stitch Counts and Pieces ???? 1. Head & Body (Crocheted separately and sewn together) Head Pattern: Start with the pink yarn for the tip of the nose: Round 1: 4 SC in MR (with pink yarn) Round 2: Switch to cream yarn. (1 SC, 1 INC)*2 = 6 SC Round 3: (2 SC, 1 INC)*2 = 8 SC Round 4: (1 SC, 1 INC)*4 = 12 SC Round 5: (1 SC, 1 INC)*6 = 18 SC Round 6: (2 SC, 1 INC)*6 = 24 SC Round 7: (3 SC, 1 INC)*6 = 30 SC Rounds 8 - 12: SC in each stitch around for 5 rounds = 30 SC (Insert safety eyes between rounds 6 and 7, leaving about 5-6 stitches between them.) Round 13: (3 SC, 1 DEC)*6 = 24 SC Round 14: (2 SC, 1 DEC)*6 = 18 SC (Stuff the head firmly with fiberfill at this point) Round 15: (1 SC, 1 DEC)*6 = 12 SC Round 16: 6 DEC = 6 SC (Cut the yarn leaving a long tail, weave through the remaining stitches, and pull tight to close).
- 2 | 3

Body Pattern (Pear Shape): Using cream yarn: Round 1: 6 SC in MR Round 2: 6 INC = 12 SC Round 3: (1 SC, 1 INC)*6 = 18 SC Round 4: (2 SC, 1 INC)*6 = 24 SC Round 5: (3 SC, 1 INC)*6 = 30 SC Round 6: (4 SC, 1 INC)*6 = 36 SC Rounds 7 - 11: SC in each stitch around for 5 rounds = 36 SC (This forms the chubby bottom part) Round 12: (4 SC, 1 DEC)*6 = 30 SC Round 13: SC around = 30 SC Round 14: (3 SC, 1 DEC)*6 = 24 SC Round 15: SC around = 24 SC Round 16: (2 SC, 1 DEC)*6 = 18 SC Round 17: SC around = 18 SC (Stuff the body firmly, leave a long tail for sewing to the head). ???? 2. Ears (Make 4 - 2 Pink, 2 Cream) The ears have a pink inner side and a cream outer side. Round 1: 6 SC in MR Round 2: 6 INC = 12 SC Round 3: (1 SC, 1 INC)*6 = 18 SC Fasten off the pink pieces and cut the yarn. Do not cut the yarn when you finish the 3rd round of the cream pieces. Joining: Place one pink piece and one cream piece wrong sides together. Using the cream yarn, SC through the stitches of both layers simultaneously all the way around (18 SC) to join them. Leave a long tail for sewing. Pinch and fold the bottom base of the ear slightly when sewing to give it that cupped look.
- 3 | 3

???? 3. Arms & Legs (Make 4) To create the tiny pink paw look seen in the photo: Round 1: Using pink yarn, 5 SC in MR Round 2: 5 SC (You can use bobble stitches here for distinct toes, or keep it simple with plain SC) Round 3: Switch to cream yarn, 5 SC Rounds 4 - 7: SC around for 4 rounds = 5 SC. Stuff very lightly or leave empty, flatten the top, and SC the edges closed. Leave a tail for sewing. ???? 4. Tail Using cream or pink yarn, chain 20-25. Slip stitch (sl st) back down the chain. Fasten off, leaving a tail to attach to the back of the body. ???? Assembly & Details Head & Body: Sew the stuffed head onto the body securely, making sure the face aligns nicely with the front of the body. Ears: Position the ears symmetrically on top of the head, curving them slightly forward as you sew them down. Arms & Legs: Sew the arms just below the neck area. Sew the legs onto the lower sides of the body so that the mouse can sit balanced. Face Details & Whiskers: Use black embroidery thread to stitch tiny eyelashes or eyebrows near the eyes. For the whiskers, run a needle with thin fishing line or stiff sewing thread straight through the snout, pull it through, and knot it close to the face. Apply a touch of real cosmetic blush or pink pastel chalk to the cheeks and the inside of the ears for that cute, flushed look.
Popular Videos



Related Galleries